Skip to content
Search
Cart
Skip to product information

Muy Caliente

Regular price
$16.00
Regular price
Sale price
$16.00 Save $-16.00 (%)
Shipping calculated at checkout.
Only 5 Left!
14 day easy exchange
Go to cart
Go to cart

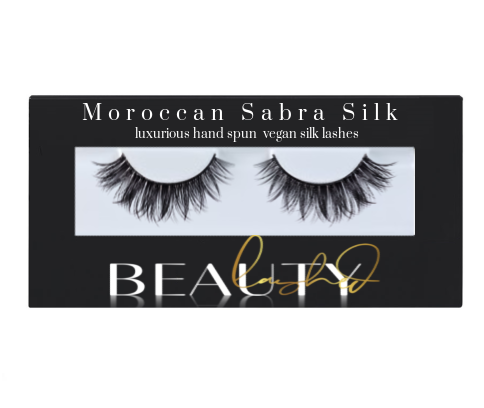
Moroccan Sabra Silk Lash Collection

 Our Flaunty 3D Moroccan Sabra Silk Lash Collection of Vegan Silk lashes are made with Premium plant-derived silk harvested from Saharan Aloe Vera cacti in northern Morocco. The plants are most commonly found in the Saharan dessert. After the silk fibers are taken from the plants, they are washed, dyed, dried and then hand-spun to mimic the look of real silk lashes! This ultra-wispy set of false lashes is ideal for achieving an Insta-worthy finish that adds length, volume and seduction to any look, while still being incredibly comfortable to wear. 

  • 3D Vegan Silk Lash, 100% Vegan
  • Luxelash™ technology
  • Reusable up to 25+ Wears depending on care
  • Black Lightweight Cotton Band
  • Wispy Clusters With Varying Lengths, Dramatic Effect


    LASH DETAILS


  • Ideal for those who want their eye look to be ultra glam
  • Premium synthetic lashes
  • Vegan strip lash
  • Style: Round, Wispy, Fluttery, Bold
  • Bold, Full-Body Flare
  • Volume: Maximum
  • Density: Classic 
  • Glasses Compatible: Yes 
  • Length: 15-17mm
  • Reusable up to 25+ Wears with proper care
  •  


    LASH BAND

    Made for 24 hour wear, our black cotton lash band contours and flexes naturally to your eye shape. It features very narrow, very soft, woven cotton that will not stick eyelids after fitting and are very comfortable worn on the human lash line.


    HOW TO USE

    STEP 1: Hold the strip lash up to your eyelid to see if it's the right size. Before you apply any eyelash strip adhesive, check to see that the strip lash is the right size for your eyes. Hold the lash strip up to your upper eyelid and place it against your lash line so it's right on the edge of your eyelid. The whole strip lash should fit on your eyelid and match up with your natural lash line.

    • If the lash strip is longer than your natural lash line, then it's too long. Trim if needed.

    STEP 2: Remove the old adhesive from the strip if you've worn it before. Look at the lash to see if there is any old adhesive stuck to it. Grasp the adhesive with your fingers and pull it away from the strip gently. It may come off in 1 piece or you may need to pull off multiple small pieces of leftover adhesive.
    Repeat for the other lash.

    • Repeat steps on the other eye.

    STEP 3: Wrap a new lash strip around your finger to soften the spine. If the lash strips you're applying are brand new, soften them up to improve the fit. Place 1 of the lash strips on your index finger between the knuckle and fingernail. Press the strip around your finger and hold it there for about 10 seconds to shape and soften the strip

    • Repeat for the second lash.

    STEP 4: Starting with one eye, apply your lash adhesive from the inner to the outer corner of the false lash line. Place a small, thin ribbon of eyelash adhesive along the band of the lash. Allow adhesive to tack (about 30 seconds) before applying.  To make sure you don't use too much adhesive, you can use an adhesive applicator or a toothpick to apply the glue to the strip lash.

    • Be careful not to get the adhesive on the lashes.
    • Do not blow on the lash strip after you apply the glue! This will introduce bacteria and it may cause the lash strip adhesive to dry too quickly

    STEP 4: Press the strip against your eyelid right along your lash line. Once the glue is distributed evenly along the strip, position the strip on your eyelid right along your lash line. Make sure that the adhesive is facing down towards your eyelid. Use your fingers or a pair of tweezers to press the strip down gently along your lash line.

    • You can also use lash applicator or tweezers or a cotton swab to press the lashes against your natural lashes. Just be careful not to poke yourself in the eye!
    • Repeat steps on the other eye.


    PRO TIP: It is recommended that you apply one thin coat of mascara to your natural lashes before applying fake eyelashes. This allows the falsies to easily stick to your natural lashes, and provides a more natural, seamless blend.


    LASH CARE

    To Remove:

    When done wearing the lashes, gently remove them by lifting the band of the lash off of the skin at the inner corner of the eye, then using that bit of base to gently remove the remainder of the lash. Never pull on the lashes to remove, always use the band. To ensure maximum longevity of lashes, follow below instructions to clean & store.

    If your lashes have buildup on them, DO NOT GET THEM WET, this will ruin them. To clean off any buildup gently brush your lashes with a clean mascara spooly. You may also carefully remove leftover glue on the band of the lash with tweezers. Please NEVER fully soak your lashes.

    To Clean:

    • To clean off any buildup gently brush your lashes with a clean mascara spooly. You may also carefully remove leftover glue on the band of the lash with tweezers.
    • To clean the actual lash hairs, place on top of a soft tissue or paper towel. Apply an oil-free makeup remover or micellar water cleanser to a cotton swab and gently brush away any unwanted makeup or debris. Please be sure to use an oil-free makeup remover or cleanser as oil-based cleansers can be harmful to the lashes.
    • Please NEVER fully soak your lashes.

    To Store:

    Gently remove lashes using lash applicator or fingertips. To store lashes, return each lash to their home (box) on the tray insert found within the original packaging and return to box. This will help to maintain the overall shape and curl of the lashes as well as prevent dirt or debris from coming into contact with lashes while being stored.

    With proper care, lashes can be reused and applied up to 25+wears.

    Moroccan Sabra Silk Lash Collection

     Our Flaunty 3D Moroccan Sabra Silk Lash Collection of Vegan Silk lashes are made with Premium plant-derived silk harvested from Saharan Aloe Vera cacti in northern Morocco. The plants are most commonly found in the Saharan dessert. After the silk fibers are taken from the plants, they are washed, dyed, dried and then hand-spun to mimic the look of real silk lashes! This ultra-wispy set of false lashes is ideal for achieving an Insta-worthy finish that adds length, volume and seduction to any look, while still being incredibly comfortable to wear. 

    • 3D Vegan Silk Lash, 100% Vegan
    • Luxelash™ technology
    • Reusable up to 25+ Wears depending on care
    • Black Lightweight Cotton Band
    • Wispy Clusters With Varying Lengths, Dramatic Effect


      LASH DETAILS


    • Ideal for those who want their eye look to be ultra glam
    • Premium synthetic lashes
    • Vegan strip lash
    • Style: Round, Wispy, Fluttery, Bold
    • Bold, Full-Body Flare
    • Volume: Maximum
    • Density: Classic 
    • Glasses Compatible: Yes 
    • Length: 15-17mm
    • Reusable up to 25+ Wears with proper care
    •  


      LASH BAND

      Made for 24 hour wear, our black cotton lash band contours and flexes naturally to your eye shape. It features very narrow, very soft, woven cotton that will not stick eyelids after fitting and are very comfortable worn on the human lash line.


      HOW TO USE

      STEP 1: Hold the strip lash up to your eyelid to see if it's the right size. Before you apply any eyelash strip adhesive, check to see that the strip lash is the right size for your eyes. Hold the lash strip up to your upper eyelid and place it against your lash line so it's right on the edge of your eyelid. The whole strip lash should fit on your eyelid and match up with your natural lash line.

      • If the lash strip is longer than your natural lash line, then it's too long. Trim if needed.

      STEP 2: Remove the old adhesive from the strip if you've worn it before. Look at the lash to see if there is any old adhesive stuck to it. Grasp the adhesive with your fingers and pull it away from the strip gently. It may come off in 1 piece or you may need to pull off multiple small pieces of leftover adhesive.
      Repeat for the other lash.

      • Repeat steps on the other eye.

      STEP 3: Wrap a new lash strip around your finger to soften the spine. If the lash strips you're applying are brand new, soften them up to improve the fit. Place 1 of the lash strips on your index finger between the knuckle and fingernail. Press the strip around your finger and hold it there for about 10 seconds to shape and soften the strip

      • Repeat for the second lash.

      STEP 4: Starting with one eye, apply your lash adhesive from the inner to the outer corner of the false lash line. Place a small, thin ribbon of eyelash adhesive along the band of the lash. Allow adhesive to tack (about 30 seconds) before applying.  To make sure you don't use too much adhesive, you can use an adhesive applicator or a toothpick to apply the glue to the strip lash.

      • Be careful not to get the adhesive on the lashes.
      • Do not blow on the lash strip after you apply the glue! This will introduce bacteria and it may cause the lash strip adhesive to dry too quickly

      STEP 4: Press the strip against your eyelid right along your lash line. Once the glue is distributed evenly along the strip, position the strip on your eyelid right along your lash line. Make sure that the adhesive is facing down towards your eyelid. Use your fingers or a pair of tweezers to press the strip down gently along your lash line.

      • You can also use lash applicator or tweezers or a cotton swab to press the lashes against your natural lashes. Just be careful not to poke yourself in the eye!
      • Repeat steps on the other eye.


      PRO TIP: It is recommended that you apply one thin coat of mascara to your natural lashes before applying fake eyelashes. This allows the falsies to easily stick to your natural lashes, and provides a more natural, seamless blend.


      LASH CARE

      To Remove:

      When done wearing the lashes, gently remove them by lifting the band of the lash off of the skin at the inner corner of the eye, then using that bit of base to gently remove the remainder of the lash. Never pull on the lashes to remove, always use the band. To ensure maximum longevity of lashes, follow below instructions to clean & store.

      If your lashes have buildup on them, DO NOT GET THEM WET, this will ruin them. To clean off any buildup gently brush your lashes with a clean mascara spooly. You may also carefully remove leftover glue on the band of the lash with tweezers. Please NEVER fully soak your lashes.

      To Clean:

      • To clean off any buildup gently brush your lashes with a clean mascara spooly. You may also carefully remove leftover glue on the band of the lash with tweezers.
      • To clean the actual lash hairs, place on top of a soft tissue or paper towel. Apply an oil-free makeup remover or micellar water cleanser to a cotton swab and gently brush away any unwanted makeup or debris. Please be sure to use an oil-free makeup remover or cleanser as oil-based cleansers can be harmful to the lashes.
      • Please NEVER fully soak your lashes.

      To Store:

      Gently remove lashes using lash applicator or fingertips. To store lashes, return each lash to their home (box) on the tray insert found within the original packaging and return to box. This will help to maintain the overall shape and curl of the lashes as well as prevent dirt or debris from coming into contact with lashes while being stored.

      With proper care, lashes can be reused and applied up to 25+wears.